Thursday, September 22, 2011

Running / Debugging Apache Axis2 inside IntelliJ IDEA

  1. Introduction
  2. Required tools
  3. Setting up
  4. Getting the source and Building
  5. Open Axis2 source with IDEA
  6. Run/debug configuration
  7. Add required libraries
  8. Run/debug Axis2 within IDEA

1.Introduction

Apache Axis2 is a famous web services engine and toolkit which is heavily used in industry.


2.Required Tools

Linux
Sun JDK 1.6
IntelliJ IDEA 10.5
Maven 2
Subversion 1.6

3.Setting up

Make sure you've correctly installed Sun JDK, Maven2 and SVN. (refer to my previous posts for details)

4.Getting the source and Building


Create the folder where you want to get sources.
for example, if you want it in "axis2Source"

then get the source from apache subversion repository by,


goto the modules/distribution directory and execute:
 

That will compile the sources and build binary and source distributions.
Goto taget directory. You will see the binary distribution pack created as axis2-1.7.0-SNAPSHOT-bin.zi.
Extract it in the same directory.

5.Open Axis2 source with IDEA

Goto IDEA.
Goto File->Open Project
Browse to the axis2Source directory

Select the parent pom and press OK. IDEA will automatically import all the modules and create the project structure.


6.Run/debug configuration

Goto Run->Edit Configurations
Add "Application" configuration using the "+" button.
Select org.apache.axis2.transport.SimpleAxis2Server as the Mail class


Set the desired log4j properties file as a VM parameter:
For example:


You have to pass axis2 repository location and axis2.xml path as program parameters.
Set the working directory as extracted bin distro root


Select the module you want to debug in "Use classpath and JDK of module" and press OK

 
 7.Add required libraries

Then you have to make sure all the libs required for axis2 to start are available in the classpath.
To configure that, select the desired module (axis2kernal) in project window and press F4 to open configure dialog box.
Goto dependencies tab and press Add, select Library from drop down menu.

Click "New Library..."
Select "Attatch jar directories..."

Select the lib directory of the binary distribution

Give a name such as "axis2Lib" and press OK.
You can also select other modules as dependencies if you want to debug them as well.


Finally, press OK to exit the configuration dialog.

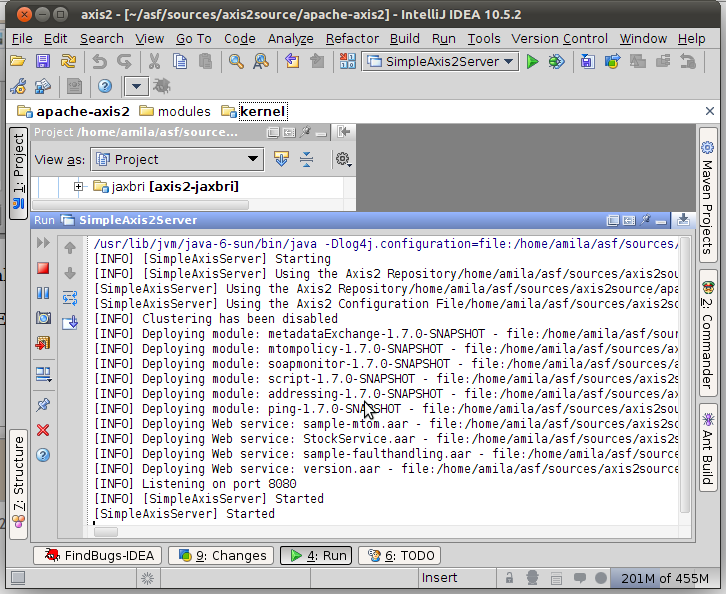
8.Run/debug Axis2 within IDEA

Now you can Start the Axis2 server inside IDEA by the Run command (Shift+F10).
Try pointing your browser to http://localhost:8080/ and see if services get listed.


And you can debug axis2 as you debug any other code. Try setting a breakpoint in SimpleAxis2Server and start debugging (Shift+F9)


Advantage here is that, you don't have to maven build every time you change something, as opposed to remote debugging.

Tuesday, May 31, 2011

XML Pretty Printing Without External Dependencies

This code uses javax.xml.transform to perform a simple XSL transformation to pretty print a given XML as a string. Hope someone will find this useful.

import java.io.ByteArrayInputStream;
import java.io.ByteArrayOutputStream;

import javax.xml.transform.*;
import javax.xml.transform.stream.*;

public class XMLPrettyPrinter {
 
 public static void main(String[] args) {
  new XMLPrettyPrinter().demo();
 }

 private void demo() {
  String input = "info";
  String output = new String();
  try {
   output = this.prettify(input);
  } catch (Exception e) {
  }
  System.out.println("Input XML:\n" + input);
  System.out.println("\nOutput XML:\n" + output);
 }

 private String prettyPrintStylesheet = 
    ""
  + "  "
  + "  "
  + "  "
  + "    "
  + "  "
  + "  "
  + "        "
  + "          "
  + "        " 
  + "  " 
  + "";
 
 public String prettify(String inputXML) throws Exception {

  Source stylesheetSource = new StreamSource(new ByteArrayInputStream(
    prettyPrintStylesheet.getBytes()));

  Source xmlSource = new StreamSource(new ByteArrayInputStream(
    inputXML.getBytes()));
  ByteArrayOutputStream out = new ByteArrayOutputStream();

  TransformerFactory tf = TransformerFactory.newInstance();
  Templates templates = tf.newTemplates(stylesheetSource);
  Transformer transformer = templates.newTransformer();
  transformer.transform(xmlSource, new StreamResult(out));
  return out.toString();
 }

}

Tuesday, March 15, 2011

Building WSO2 Carbon from Source


  1. Introduction
  2. Required(and recommended) tools
  3. Setting up
  4. Getting the source
  5. Building
  6. Tips/Issues/Fixes

1.Introduction


Carbon is the core platform of complete enterprise middleware stack by WSO2 which is completely open source.
Read more here: http://wso2.org/


2.Required Tools

Linux
Sun Java Development Kit 1.6
Apache Maven 2.2
Apache Ant 1.8
Subversion 1.6

3.Setting up

You have to be online.

a.Install java:

Goto terminal

Allow the download and accept the terms when done.
Environment variables will be automatically created for you by the installer.
Verify if it's correctly installed by


b.Install Maven

Ant also should be installed automatically by maven.
Verify if it's correctly installed by


c.Install Subversion

Verify if it's correctly installed by


d.Setting Maven option for permanent generation space

PermSize defines the size for the Permanent Generation which holds meta-data describing user classes. The Permanent Generation (PermGen) Space is set to a small value by default, by the JDK (64 MB maximum for JDK 1.5). Large applications such as Carbon with a large code base need this set to a higher value.
You need to set it in the environment variable MAVEN_OPTS
You can also increase the java heap size

Better approach is to set these in .bashrc file in your home so the changes will not be lost when you begin another session (or terminal)

Add the above too lines to the end of the file and save.

4.Getting the source
create the folder where you want to get sources.
for example, if you want it in "carbonSource"

then get the source from wso2 subversion repository by,

Wait until all the sources are downloaded. this includes all the dependencies
of carbon including several apache projects as well as all the carbon based
products. Therefore it's going to take a while.

5. Building
if you go inside the carbon directory, you can see


You can build all things by just using:

That will compile the sources, build all dependencies, perform tests and build jar files.
But probably it will not work straightaway, specially in the first try. Also, testing
take a long time. We don't need to test everything when building for the first time.
Therefore we can skips the tests by setting the variable maven.test.skip to true.
You should build in the following order:
  • dependencies
  • orbit
  • service-stubs
  • core
  • components
  • features
  • products
For example, to build dependencies:

When building, maven will automatically download files for plugins etc. needed
they are downloaded to local maven repository located at your home's /.m2/repository/

After you have successfully built dependencies, orbit, core, components and features, you can move on to building carbon
 
 
You can also build other products if you like.


6.Tips/Issues/Fixes

Make sure you have plenty of time and bandwidth before starting to build
After building carbon for the first time, my m2 repository had 2GiB of downloaded content.
Skip tests when you build for the first time
If your build fails halfway, when you build again, use no plugin update flag (npu).
When it's used, maven won't check for updates on already downloaded packages,
only download missing packages, so it will speed up the process.


Possible Issues & Fixes
==================


Sometimes build may fail complaining about missing artifact. Make sure your connection is working properly. Try again in a bit. If the missing artifact's has the "SNAPSHOT" part, it's a local file. Try to find the it's package using find command and build it from inside the particular package.
Compilation errors might occur rarely since carbon is under active development. If so, try updating the sources


You may also get the error:


This happens due to insufficient permanent generation space as described previously.
Verify you have correctly set maven options to increase permgen space by,
If it isn't correctly set, see the section "Setting Up" to set the variable.

Another possible error:
Increase the maximum number of open files to fix this
Add these two lines to end of the file

You can save the terminal output for later reference with tee command
For example:

Good Luck!