Wednesday, April 25, 2012

AS2 Protocol

AS2 is a protocol that describes how to exchange structured business data securely using the HTTP transfer protocol.
Structured business data exchanged using AS2 protocol can be,
  • Electronic Data Interchange (EDI) in either the
    • UN Electronic Data Interchange for Administration, Commerce, and Transport (UN/EDIFACT) format or
    • The American National Standards Committee (ANSI) X12 format
  • XML or any other structured data formats.


Major application of AS2 is to exchange data in EDI formats.

Security is achieved using digital certificates and encryption. Exchanged messages can be signed using to provide security requirements such as authenticity and preventing non-repudiation. They can be also encrypted to provide confidentiality and integrity. Those are optional requirement according to AS2 specification. An AS2 message can have its content in plain text and without a digital signature.

S/MIME is a format and protocol for adding cryptographic signature and/or encryption services to Internet MIME messages. In AS2, files are encoded as attachments in an S/MIME message. This is what we call an AS2 message. Those messages are sent using the HTTP or HTTPS, usually as POST.


Content Types and AS2


There can be several content types for AS2 messages.
  • When there is no encryption, no signature
    • application/EDIxxxx or application/xml
  • When there is no encryption, but signature is present
    • multipart/signed – message contains two MIME parts
      • application/EDIxxxx or application/xml
      • application/pkcs7-signature
  • When there is Encryption, but no signature is present
    • application/pkcs7-mime
      • application/EDIxxxx or application/xml (in the decrypted message)
  • When there is both encryption and signature
    • application/pkcs7-mime
      • multipart/signed(encrypted) – decrypted message contains 2 parts
        • application/EDIxxxx or /xml)
        • application/pkcs7-signature)

Usually AS2 clients are called "Trading partners". When sending a message, they can request an acknowledgement message called MDN (Message Disposition Notification).
There are several options of requesting a MDN. They are Synchronous MDN, Asynchronous MDN and No MDN.

If there are problems receiving or interpreting the original AS2 message, a "failed" MDN may be sent back. Both "failed" MDN and not receiving MDN (when it is requested) are considered as failures according to specs.

Mendelson (GPL) and OpenAS2 (BSD) are open source implementations of AS2 for java, These can be used to send and receive AS2 messages. Specifically, Mendelson has a user-friendly GUI.

Sunday, March 18, 2012

Ruby Notes

I recently started learning Ruby as a part of "Software Engineering for Software as a Service" online course offered by  University of California, Berkeley.

Since I am mostly experienced with java, I found some differences to be interesting.
  • Ruby is object oriented, similar to Java. 
    • But everything is an object. Even primitive types such as integers are objects. 
    • Almost everything is a method call on some object. Even most operators are instance methods. You can do method calls on anything. 
      • 6.methods will return a list of methods that it will respond to.
      • 1+2 means we pass the objects operator + and the number 2 to the send method of object 1. 1.send(:+, 2)
  • Dynamically typed
    • Even though objects have types, variable don't have types. 
    • Also, there are no declarations either
    • That means, you just can use a variable without declaring first, and use it to store any type of object.
  • Identifier Conventions
    • Class names should UpperCamelCase similar to Java
    • But methods and variable names should use snake_case unlike java's camelCase
  • Ruby is pass-by-reference, since everything is an object. (whereas Java is pass-by-value.)
  • Metaprogramming
    • this basically means you can do some of the programming during the runtime, such as method definitions. 
    • Say there's an instance variable name. Instead of writing it's getter and setter, you can specify to create them during runtime using metaprogramming by: attr_accessor :name
  • Iterators
    • Iterations play a big role in Ruby. 
    • In Java, we usually run a loop with an index and do something with the object for the index in each iteration.
    • In Ruby, iterating with an index is discouraged. Rather, we let objects manage their own traversal.
    • my_array.each do |elt| { } end
  • Duck Typing
    • An object's current set of methods and properties determines the valid semantics, rather than its inheritance from a particular class or implementation of a specific interface.
    • For example, you can call sort on arrays with different type of objects, strings, hashes, if they respond to the method somehow, without considering their types.
  • Mix-ins
    • This is used to achieve duck typing.
    • In Ruby, there are things called Modules, A module is a collection of class & instance
      methods that are not actually a class. Therefore you cannot instantiate it
    • But by including modules in your class you can resuse (mix) their methods
    • class A < B ; include MyModule ; end . A.foo first search A, MyModule and finally B.
Here are some of the resources for getting started with Ruby:
  1. Ruby in Twenty Minutes
  2. Try Ruby
Ruby Installer is a nice packaging that makes it easy to install Ruby on Windows

Wednesday, February 1, 2012

Using Apache Thrift with Maven

When you use Thrift for your project, you have to manually generate the sources, put them inside your source folder and build.

This plugin does the work for you when you execute the maven build.

However, this plugin is not yet available on maven central repositories, therefore you have to add developer's repo. to your project pom.


Then, as described in the plugin's project page, you have to:

1. Use Java 1.5 or newer due to the usage of Generics

You can specify it in the configuration of maven compiler plugin:


2. Have Thrift executable is in your PATH or set the parameter of the plugin to the correct location.


3. Include the dependency for libthrift


Then place your *.thrift files to the directory: src/main/thrift.

Now you can execute mvn clean install as usual.

Saturday, January 14, 2012

Volunteer Computing: An Introduction

As the technology advances and research areas widen, demand for computational power increases day by day. Such computational demands can be mainly observed in several categories. Physical simulations from molecular level to universe level, analysis of large data from optical telescopes, gene sequencers, gravitational wave detectors, particle colliders and biology-inspired algorithms are some of those categories.
These tasks require high-performance computing (HPC). So one solution is to use supercomputers. But typically, the rate of job completion is more important than the turnaround time of individual jobs since overall result is what’s useful. The term to refer to that idea is high-throughput computing.

To achieve high-throughput computing, distributed computing is a better approach since individual job can be processed in parallel in large quantities.
Available distributed computing options are:
○ Cluster computing - dedicated computers in a simple location.
○ Desktop grid computing - PCs within an organization as a computing resource.
○ Grid computing - sharing computing resources by separate organizations.
○ Cloud computing - a company selling access to computing power
○ Volunteer computing

Volunteer computing (also sometimes referred to as global computing) uses computational power volunteered by the general public to perform distributed scientific computing. Volunteers may include individuals as well as organizations such as universities.
This approach allow ordinary Internet users to volunteer their computer resources on idle time by forming parallel computing networks easily, quickly and inexpensively without needing expert help.

Typically when it comes to volunteer computing, the volunteers who contribute with their resources are considered to be anonymous, although some volunteer computing frameworks may collect information like a nickname and email address of the volunteers for the usage of credit system, etc.

Each of the distributed computing paradigms have different resources pools. For example, number of computers owned by a particular university when it comes to grid computing, and the number of servers owned by a company in cases of cloud computing. The number of total possible personal computers is the resource pool in the case of volunteer computing.
To understand the importance of volunteer computing, we have to consider its resource pool.
The number of privately-owned PCs around the globe is currently estimated as 1 billion and is expected to grow to 2 billion by 2015. Also, the resource pool is self-financing, self-updating and self-maintaining. Users buy and maintain their own computers. Therefore various costs associated with other types of grid computing do not apply to volunteer computing. Another important point is that consumer market adopts the latest technology quickly. A supercomputer or a computing grid cannot be replaced or upgradedeasily as newer technologies emerge. But the typical PC user can. For example, the fastest processors today are GPUs developed with computer games in mind. Due to these factors, we can state that volunteer computing has a huge potential for world computational needs.
Berkeley Open Infrastructure for Network Computing (BOINC) is the predominant volunteer computing framework in use.
Some of the other volunteer computing frameworks are:
○ Bayanihan Computing Group
○ JADIF - Java Distributed (volunteer / grid) computing Framework
○ Javelin Global Computing Project
○ XremWeb Platform
○ Entropia

Here is a list of most active volunteer computing projects as of January 2012.
SETI@home: Search for extra-terrestrial life by analyzing radio frequencies emanating from space
Einstein@home: Search for pulsars using radio signals and gravitational wave data
World Community Grid: Humanitarian research on disease, natural disasters, and hunger
Climateprediction.net: Analyse ways to improve climate prediction model
Folding@home: Computational molecular biology
LHC@home: Improve the design of the Large Hadron Collider and its detectors
Milkyway@home: Create a highly accurate three-dimensional model of the Milky Way galaxy using data collected from the Sloan Digital Sky Survey
Spinhenge@home: Study nano-magnetic molecules for research into localized tumor chemotherapy and micro-memory
PrimeGrid: Generate a list of sequential prime numbers, search for particular types of primes
Malariacontrol.net: Simulate the transmission dynamics and health effects of malaria

(This post includes citations from several sources and aims to summarize volunteer computing)

Friday, January 6, 2012

First Steps of Apache Thrift with Java in Linux


Apache Thrift is a software framework for scalable cross-language services development. It was originally developed by Facebook before it was donated to Apache Software Foundation.  

Download the stable release

Unpack the tar.gz archive to a directory you prefer
(say home /home/amila/apacheThrift)


You need JDK and Apache Ant at least to run Thrift's Java tutorial.
(You can refer to my previous posts to find how to install JDK on ubuntu.)

Use apt-get to install Ant


We first need to install Thrift compiler and language variables before we start developing we Thrift.

There are several required packages to install Thrift that are not installed on a linux distribution by default.
To install those


Goto top level directory of unpacked thrift distribution
(eg: /home/amila/apacheThrift/thrift-0.8.0)


During this process, thrift will scan and list the different language found.
It should say:

..along with other languages found on your computer.

However, to configure Thrift for all those languages, you may need to install additional packages

Now you can make Thrift:
 

You might get some error if all required libraries for the languages configured in above step are not present.

In that case, you can deselect the packages you don't need when configuring
For example, say you don't need the support for Ruby. When configuring, you can use:
 
(I had to deselect erlang libraries to get it working on ubuntu 11.04)

After make is completed successfully, install Thrift by,


To check if the installation is successfully completed:
 

You should get an output like:
 

Tutorial are located at ./tutorials directory.

There you will find two files tutorials.thrift and shared.thrift

.thrift files describe the interfaces (IDL) in terms of the classes, methods they include.


This will create a directory named "gen-java" inside your current directory which will include generated Java classes according to specified thrift file.

Now goto the directory "java" inside the current directory (tutorial) and execute ant.
The ant script will compile both generated source files and the source file inside java directory and build a jar file.

Finally, run the tutorial by:
 

You may also find this page useful.

Thursday, September 22, 2011

Running / Debugging Apache Axis2 inside IntelliJ IDEA

  1. Introduction
  2. Required tools
  3. Setting up
  4. Getting the source and Building
  5. Open Axis2 source with IDEA
  6. Run/debug configuration
  7. Add required libraries
  8. Run/debug Axis2 within IDEA

1.Introduction

Apache Axis2 is a famous web services engine and toolkit which is heavily used in industry.


2.Required Tools

Linux
Sun JDK 1.6
IntelliJ IDEA 10.5
Maven 2
Subversion 1.6

3.Setting up

Make sure you've correctly installed Sun JDK, Maven2 and SVN. (refer to my previous posts for details)

4.Getting the source and Building


Create the folder where you want to get sources.
for example, if you want it in "axis2Source"

then get the source from apache subversion repository by,


goto the modules/distribution directory and execute:
 

That will compile the sources and build binary and source distributions.
Goto taget directory. You will see the binary distribution pack created as axis2-1.7.0-SNAPSHOT-bin.zi.
Extract it in the same directory.

5.Open Axis2 source with IDEA

Goto IDEA.
Goto File->Open Project
Browse to the axis2Source directory

Select the parent pom and press OK. IDEA will automatically import all the modules and create the project structure.


6.Run/debug configuration

Goto Run->Edit Configurations
Add "Application" configuration using the "+" button.
Select org.apache.axis2.transport.SimpleAxis2Server as the Mail class


Set the desired log4j properties file as a VM parameter:
For example:


You have to pass axis2 repository location and axis2.xml path as program parameters.
Set the working directory as extracted bin distro root


Select the module you want to debug in "Use classpath and JDK of module" and press OK

 
 7.Add required libraries

Then you have to make sure all the libs required for axis2 to start are available in the classpath.
To configure that, select the desired module (axis2kernal) in project window and press F4 to open configure dialog box.
Goto dependencies tab and press Add, select Library from drop down menu.

Click "New Library..."
Select "Attatch jar directories..."

Select the lib directory of the binary distribution

Give a name such as "axis2Lib" and press OK.
You can also select other modules as dependencies if you want to debug them as well.


Finally, press OK to exit the configuration dialog.

8.Run/debug Axis2 within IDEA

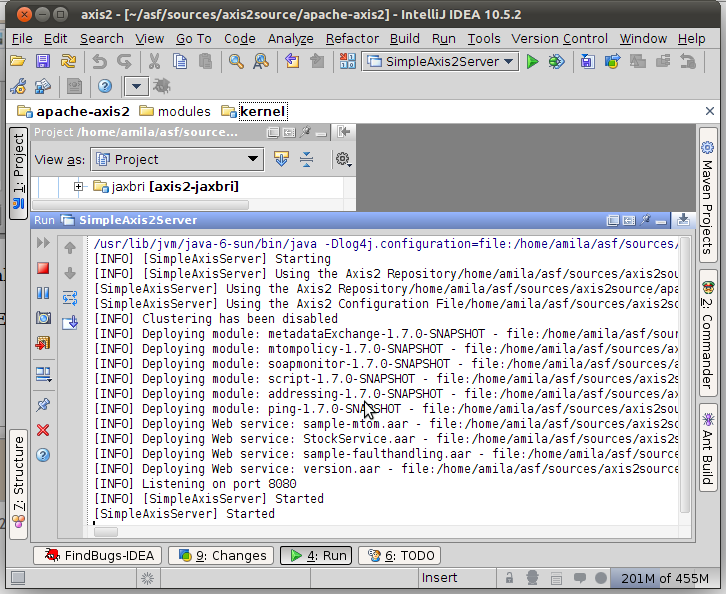
Now you can Start the Axis2 server inside IDEA by the Run command (Shift+F10).
Try pointing your browser to http://localhost:8080/ and see if services get listed.


And you can debug axis2 as you debug any other code. Try setting a breakpoint in SimpleAxis2Server and start debugging (Shift+F9)


Advantage here is that, you don't have to maven build every time you change something, as opposed to remote debugging.

Tuesday, May 31, 2011

XML Pretty Printing Without External Dependencies

This code uses javax.xml.transform to perform a simple XSL transformation to pretty print a given XML as a string. Hope someone will find this useful.

import java.io.ByteArrayInputStream;
import java.io.ByteArrayOutputStream;

import javax.xml.transform.*;
import javax.xml.transform.stream.*;

public class XMLPrettyPrinter {
 
 public static void main(String[] args) {
  new XMLPrettyPrinter().demo();
 }

 private void demo() {
  String input = "info";
  String output = new String();
  try {
   output = this.prettify(input);
  } catch (Exception e) {
  }
  System.out.println("Input XML:\n" + input);
  System.out.println("\nOutput XML:\n" + output);
 }

 private String prettyPrintStylesheet = 
    ""
  + "  "
  + "  "
  + "  "
  + "    "
  + "  "
  + "  "
  + "        "
  + "          "
  + "        " 
  + "  " 
  + "";
 
 public String prettify(String inputXML) throws Exception {

  Source stylesheetSource = new StreamSource(new ByteArrayInputStream(
    prettyPrintStylesheet.getBytes()));

  Source xmlSource = new StreamSource(new ByteArrayInputStream(
    inputXML.getBytes()));
  ByteArrayOutputStream out = new ByteArrayOutputStream();

  TransformerFactory tf = TransformerFactory.newInstance();
  Templates templates = tf.newTemplates(stylesheetSource);
  Transformer transformer = templates.newTransformer();
  transformer.transform(xmlSource, new StreamResult(out));
  return out.toString();
 }

}