Showing posts with label java. Show all posts

Sunday, June 23, 2013

Secure WebSockets with Jetty

Websockets is a protocol that runs on top of TCP and allows server to push data to the client, unlike with HTTP. Let's see how to use WebSockets with TLS using Eclipse Jetty.

Add following dependencies to the project POM

<dependency>
    <groupId>org.eclipse.jetty</groupId>
    <artifactId>jetty-server</artifactId>
    <version>9.0.3.v20130506</version>
</dependency>
<dependency>
    <groupId>org.eclipse.jetty.websocket</groupId>
    <artifactId>websocket-server</artifactId>
    <version>9.0.3.v20130506</version>
</dependency>
<dependency>
    <groupId>org.eclipse.jetty.websocket</groupId>
    <artifactId>websocket-client</artifactId>
    <version>9.0.3.v20130506</version>
</dependency>

Create a websocket by annotating with @WebSocket

package org.amila.sample.websocket.server;

import org.eclipse.jetty.websocket.api.RemoteEndpoint;
import org.eclipse.jetty.websocket.api.Session;
import org.eclipse.jetty.websocket.api.annotations.OnWebSocketClose;
import org.eclipse.jetty.websocket.api.annotations.OnWebSocketConnect;
import org.eclipse.jetty.websocket.api.annotations.OnWebSocketMessage;
import org.eclipse.jetty.websocket.api.annotations.WebSocket;

import java.io.IOException;

@WebSocket
public class MyWebSocket {
    private RemoteEndpoint remote;

    @OnWebSocketConnect
    public void onConnect(Session session) {
        System.out.println("WebSocket Opened");
        this.remote = session.getRemote();
    }

    @OnWebSocketMessage
    public void onMessage(String message) {
        System.out.println("Message from Client: " + message);
        try {
            remote.sendString("Hi Client");
        } catch (IOException e) {
            e.printStackTrace();
        }
    }

    @OnWebSocketClose
    public void onClose(int statusCode, String reason) {
        System.out.println("WebSocket Closed. Code:" + statusCode);
    }
}

This is the jetty server configured with TLS. Pass a SslConnectionFactory when creating the connector to enable secure communication. For this sample, I've generated a keystore and truststore using java keytool and placed them in src/resources.
Call addWebSocket() with your annotated WebSocket pojo to add WebSockets to the server.

package org.amila.sample.websocket.server;

import org.eclipse.jetty.http.HttpVersion;
import org.eclipse.jetty.server.*;
import org.eclipse.jetty.server.handler.ContextHandler;
import org.eclipse.jetty.server.handler.HandlerCollection;
import org.eclipse.jetty.util.resource.FileResource;
import org.eclipse.jetty.util.resource.Resource;
import org.eclipse.jetty.util.ssl.SslContextFactory;
import org.eclipse.jetty.websocket.server.WebSocketHandler;
import org.eclipse.jetty.websocket.servlet.WebSocketServletFactory;

import java.util.ArrayList;
import java.util.List;

public class WebSocketServer {
    private Server server;
    private String host;
    private int port;
    private Resource keyStoreResource;
    private String keyStorePassword;
    private String keyManagerPassword;
    private List<Handler> webSocketHandlerList = new ArrayList<>();

    public static void main(String[] args) throws Exception {
        WebSocketServer webSocketServer = new WebSocketServer();
        webSocketServer.setHost("localhost");
        webSocketServer.setPort(8443);
        webSocketServer.setKeyStoreResource(new FileResource(WebSocketServer.class.getResource("/keystore.jks")));
        webSocketServer.setKeyStorePassword("password");
        webSocketServer.setKeyManagerPassword("password");
        webSocketServer.addWebSocket(MyWebSocket.class, "/");
        webSocketServer.initialize();
        webSocketServer.start();
    }

    public void initialize() {
        server = new Server();
        // connector configuration
        SslContextFactory sslContextFactory = new SslContextFactory();
        sslContextFactory.setKeyStoreResource(keyStoreResource);
        sslContextFactory.setKeyStorePassword(keyStorePassword);
        sslContextFactory.setKeyManagerPassword(keyManagerPassword);
        SslConnectionFactory sslConnectionFactory = new SslConnectionFactory(sslContextFactory, HttpVersion.HTTP_1_1.asString());
        HttpConnectionFactory httpConnectionFactory = new HttpConnectionFactory(new HttpConfiguration());
        ServerConnector sslConnector = new ServerConnector(server, sslConnectionFactory, httpConnectionFactory);
        sslConnector.setHost(host);
        sslConnector.setPort(port);
        server.addConnector(sslConnector);
        // handler configuration
        HandlerCollection handlerCollection = new HandlerCollection();
        handlerCollection.setHandlers(webSocketHandlerList.toArray(new Handler[0]));
        server.setHandler(handlerCollection);
    }

    public void addWebSocket(final Class<?> webSocket, String pathSpec) {
        WebSocketHandler wsHandler = new WebSocketHandler() {
            @Override
            public void configure(WebSocketServletFactory webSocketServletFactory) {
                webSocketServletFactory.register(webSocket);
            }
        };
        ContextHandler wsContextHandler = new ContextHandler();
        wsContextHandler.setHandler(wsHandler);
        wsContextHandler.setContextPath(pathSpec);  // this context path doesn't work ftm
        webSocketHandlerList.add(wsHandler);
    }

    public void start() throws Exception {
        server.start();
        server.join();
    }
    public void stop() throws Exception {
        server.stop();
        server.join();
    }

    public void setHost(String host) {
        this.host = host;
    }
    public void setPort(int port) {
        this.port = port;
    }
    public void setKeyStoreResource(Resource keyStoreResource) {
        this.keyStoreResource = keyStoreResource;
    }
    public void setKeyStorePassword(String keyStorePassword) {
        this.keyStorePassword = keyStorePassword;
    }
    public void setKeyManagerPassword(String keyManagerPassword) {
        this.keyManagerPassword = keyManagerPassword;
    }

}

And finally the client code. WebSocket is included as an inner class. Pass a SslContextFactory when creating the client and sure "wss" as the protocol prefix of the URL.

package org.amila.sample.websocket.client;

import org.eclipse.jetty.util.resource.Resource;
import org.eclipse.jetty.util.ssl.SslContextFactory;
import org.eclipse.jetty.websocket.api.Session;
import org.eclipse.jetty.websocket.api.annotations.OnWebSocketClose;
import org.eclipse.jetty.websocket.api.annotations.OnWebSocketConnect;
import org.eclipse.jetty.websocket.api.annotations.OnWebSocketMessage;
import org.eclipse.jetty.websocket.api.annotations.WebSocket;
import org.eclipse.jetty.websocket.client.ClientUpgradeRequest;
import org.eclipse.jetty.websocket.client.WebSocketClient;
import java.io.IOException;
import java.net.URI;
import java.net.URISyntaxException;
import java.util.concurrent.CountDownLatch;
import java.util.concurrent.TimeUnit;

public class JettyWebSocketClient {

    public static void main(String[] args) throws IOException, URISyntaxException {
        new JettyWebSocketClient().run(new URI("wss://localhost:8443/"));
    }
    
    public void run(URI destinationUri) throws IOException {

        SslContextFactory sslContextFactory = new SslContextFactory();
        Resource keyStoreResource = Resource.newResource(this.getClass().getResource("/truststore.jks"));
        sslContextFactory.setKeyStoreResource(keyStoreResource);
        sslContextFactory.setKeyStorePassword("password");
        sslContextFactory.setKeyManagerPassword("password");
        WebSocketClient client = new WebSocketClient(sslContextFactory);
        MyWebSocket socket = new MyWebSocket();
        try {
            client.start();
            ClientUpgradeRequest request = new ClientUpgradeRequest();
            System.out.println("Connecting to : " + destinationUri);
            client.connect(socket, destinationUri, request);
            socket.awaitClose(5, TimeUnit.SECONDS);
        } catch (Throwable t) {
            t.printStackTrace();
        } finally {
            try {
                client.stop();
            } catch (Exception e) {
                e.printStackTrace();
            }
        }
    }

    @WebSocket
    public class MyWebSocket {
        private final CountDownLatch closeLatch = new CountDownLatch(1);

        @OnWebSocketConnect
        public void onConnect(Session session) {
            System.out.println("WebSocket Opened in client side");
            try {
                System.out.println("Sending message: Hi server");
                session.getRemote().sendString("Hi Server");
            } catch (IOException e) {
                e.printStackTrace();
            }
        }

        @OnWebSocketMessage
        public void onMessage(String message) {
            System.out.println("Message from Server: " + message);
        }

        @OnWebSocketClose
        public void onClose(int statusCode, String reason) {
            System.out.println("WebSocket Closed. Code:" + statusCode);
        }

        public boolean awaitClose(int duration, TimeUnit unit) throws InterruptedException {
            return this.closeLatch.await(duration, unit);
        }
    }

}

Thursday, September 27, 2012

Creating OSGi Bundles with Maven Bundle Plugin

OSGi is a framework specification to create java applications based on a complete and dynamic component model. That means your application can be entirely consisted of cohesive and loosely-coupled modules. These modules are called "bundles" in OSGi jargon.

There are several implementations including Apache Felix and Eclipse Equinox. These implementations use existing capabilities of Java Archive (jar) files to implement OSGi bundles. If you look inside a general jar file (which is basically a zip file with .jar extension), there will be a file called MANIFEST.MF inside a directory named META-INF. If the jar was built by maven it will contain some meta data like: 
Manifest-Version: 1.0
Archiver-Version: Plexus Archiver
Created-By: Apache Maven
Built-By: amilas
Build-Jdk: 1.6.0_35


There are manifest headers specific to OSGi so that runtime can recognize the jar file as a bundle ( and more). Bnd is a tool used to insert those headers into jar files.

While there's built-in support for OSGI in famous IDEs such as Eclipse and IntelliJ IDEA, if your project is maven-based, it's convenient to use maven for creating bundles too.
Maven Bundle Plugin can be used for this purpose. We can specify OSGi parameters in the module POM and the bundle plugin will use Bnd to automatically insert them and create an OSGi bundle.

This is a introductory post to show how to use Maven with IntelliJ IDEA to create OSGi bundles.

Goto File-> New Project... and select "Create  project from scratch"
At the next screen, enter give a project name and a location as shown. Make sure to select the type as Maven Module.


Finally enter a group id as shown, and click finish.

This will create a new project and a module from maven archtype.

Now let's create two sub modules for our project. these will be the resulting OSGi bundles.

Goto File-> Add Module... again "Create  project from scratch" and name the module as "module-a". In the final screen "Add module to" and "parent" fields should be automatically filled as shown.


Similarly add another module named module-b

 Create two packages "api" and "impl" inside org.amila.sample.osgi.a in module-a, and similarly in module-b so the project pane will show the project structure as follows.

You can use Bundle activator to perform some tasks when the OSGi framework starts or stops a certain bundle. We can implement org.osgi.framework.BundleActivator interface to utilize this function.
Create a new class Adapter in your impl package in module A. Use the following code:

package org.amila.sample.osgi.a.impl;

import org.osgi.framework.BundleActivator;
import org.osgi.framework.BundleContext;

public class Activator implements BundleActivator {

    /**
     * Implements BundleActivator.start().
     * @param bundleContext - the framework context for the bundle.
     **/
    @Override
    public void start(BundleContext bundleContext) throws Exception {
        System.out.println("Module A is starting");
    }

    /**
     * Implements BundleActivator.stop().
     * @param bundleContext - the framework context for the bundle.
     **/
    @Override
    public void stop(BundleContext bundleContext) throws Exception {
        System.out.println("Module A is shutting down");
    }
}

Add the felix dependency to the module POM.


Set the packaging to "bundle" and add the maven bundle plugin.

After these changes, pom.xml of module-a should look like this:

<?xml version="1.0" encoding="UTF-8"?>
<project xmlns="http://maven.apache.org/POM/4.0.0"
         xmlns:xsi="http://www.w3.org/2001/XMLSchema-instance"
         xsi:schemaLocation="http://maven.apache.org/POM/4.0.0 http://maven.apache.org/xsd/maven-4.0.0.xsd">
    <parent>
        <artifactId>OsgiDemo</artifactId>
        <groupId>org.amila.sample.osgi</groupId>
        <version>1.0</version>
    </parent>
    <modelVersion>4.0.0</modelVersion>
    <artifactId>module-a</artifactId>
    <packaging>bundle</packaging>

    <build>
        <plugins>
            <plugin>
                <groupId>org.apache.felix</groupId>
                <artifactId>maven-bundle-plugin</artifactId>
                <version>2.3.7</version>
                <extensions>true</extensions>
                <configuration>
                    <instructions>
                        <Bundle-SymbolicName>${project.groupId}.${project.artifactId}</Bundle-SymbolicName>
                        <Bundle-Name>${project.artifactId}</Bundle-Name>
                        <Bundle-Version>1.0.0</Bundle-Version>
                        <Bundle-Activator>org.amila.sample.osgi.a.impl.Activator</Bundle-Activator>
                        <Private-Package>org.amila.sample.osgi.a.impl</Private-Package>
                   </instructions>
                </configuration>
            </plugin>
        </plugins>
    </build>
    <dependencies>
        <dependency>
            <groupId>org.apache.felix</groupId>
            <artifactId>org.osgi.core</artifactId>
            <version>1.4.0</version>
        </dependency>
    </dependencies>

</project>

Similarly add Activator and bundle configuration for module B.

 Now, you can build the project using maven. Resulting jar files will be OSGi bundles. If you open MANIFEST.MF file of a bundle now it will contain bundle headers as we configured in the module POM.

You don't have to specify packages to import. If your module uses a package from another module, its import header will be automatically added to the manifest.mf file.

Sunday, September 2, 2012

Obtaining a List of IP Addresses

During our final year project I wanted to get active ip addresses of a node. This is easily doable using java.net.NetworkInterface
The method below returns a list of IP addresses of a machine except those belonging to loopback or inactive network interfaces. The addresses can be further classified as IPv4 or IPv6 using instance check with java.net.Inet4Address and java.net.Inet6Address
    public static List<InetAddress> getIPAddress() throws SocketException {

        List<InetAddress> ipAddresses = new ArrayList<InetAddress>();
        Enumeration e;
        e = NetworkInterface.getNetworkInterfaces();
        while (e.hasMoreElements()) {
            NetworkInterface ni = (NetworkInterface) e.nextElement();
            if (ni.isLoopback() || !ni.isUp()) continue;

            for (Enumeration e2 = ni.getInetAddresses(); e2.hasMoreElements(); ) {
                InetAddress ip = (InetAddress) e2.nextElement();
                ipAddresses.add(ip);
            }
        }
        return ipAddresses;
    }

Sunday, March 18, 2012

Ruby Notes

I recently started learning Ruby as a part of "Software Engineering for Software as a Service" online course offered by  University of California, Berkeley.

Since I am mostly experienced with java, I found some differences to be interesting.
  • Ruby is object oriented, similar to Java. 
    • But everything is an object. Even primitive types such as integers are objects. 
    • Almost everything is a method call on some object. Even most operators are instance methods. You can do method calls on anything. 
      • 6.methods will return a list of methods that it will respond to.
      • 1+2 means we pass the objects operator + and the number 2 to the send method of object 1. 1.send(:+, 2)
  • Dynamically typed
    • Even though objects have types, variable don't have types. 
    • Also, there are no declarations either
    • That means, you just can use a variable without declaring first, and use it to store any type of object.
  • Identifier Conventions
    • Class names should UpperCamelCase similar to Java
    • But methods and variable names should use snake_case unlike java's camelCase
  • Ruby is pass-by-reference, since everything is an object. (whereas Java is pass-by-value.)
  • Metaprogramming
    • this basically means you can do some of the programming during the runtime, such as method definitions. 
    • Say there's an instance variable name. Instead of writing it's getter and setter, you can specify to create them during runtime using metaprogramming by: attr_accessor :name
  • Iterators
    • Iterations play a big role in Ruby. 
    • In Java, we usually run a loop with an index and do something with the object for the index in each iteration.
    • In Ruby, iterating with an index is discouraged. Rather, we let objects manage their own traversal.
    • my_array.each do |elt| { } end
  • Duck Typing
    • An object's current set of methods and properties determines the valid semantics, rather than its inheritance from a particular class or implementation of a specific interface.
    • For example, you can call sort on arrays with different type of objects, strings, hashes, if they respond to the method somehow, without considering their types.
  • Mix-ins
    • This is used to achieve duck typing.
    • In Ruby, there are things called Modules, A module is a collection of class & instance
      methods that are not actually a class. Therefore you cannot instantiate it
    • But by including modules in your class you can resuse (mix) their methods
    • class A &lt; B ; include MyModule ; end . A.foo first search A, MyModule and finally B.
Here are some of the resources for getting started with Ruby:
  1. Ruby in Twenty Minutes
  2. Try Ruby
Ruby Installer is a nice packaging that makes it easy to install Ruby on Windows

Wednesday, February 1, 2012

Using Apache Thrift with Maven

When you use Thrift for your project, you have to manually generate the sources, put them inside your source folder and build.

This plugin does the work for you when you execute the maven build.

However, this plugin is not yet available on maven central repositories, therefore you have to add developer's repo. to your project pom.


Then, as described in the plugin's project page, you have to:

1. Use Java 1.5 or newer due to the usage of Generics

You can specify it in the configuration of maven compiler plugin:


2. Have Thrift executable is in your PATH or set the parameter of the plugin to the correct location.


3. Include the dependency for libthrift


Then place your *.thrift files to the directory: src/main/thrift.

Now you can execute mvn clean install as usual.

Friday, January 6, 2012

First Steps of Apache Thrift with Java in Linux


Apache Thrift is a software framework for scalable cross-language services development. It was originally developed by Facebook before it was donated to Apache Software Foundation.  

Download the stable release

Unpack the tar.gz archive to a directory you prefer
(say home /home/amila/apacheThrift)


You need JDK and Apache Ant at least to run Thrift's Java tutorial.
(You can refer to my previous posts to find how to install JDK on ubuntu.)

Use apt-get to install Ant


We first need to install Thrift compiler and language variables before we start developing we Thrift.

There are several required packages to install Thrift that are not installed on a linux distribution by default.
To install those


Goto top level directory of unpacked thrift distribution
(eg: /home/amila/apacheThrift/thrift-0.8.0)


During this process, thrift will scan and list the different language found.
It should say:

..along with other languages found on your computer.

However, to configure Thrift for all those languages, you may need to install additional packages

Now you can make Thrift:
 

You might get some error if all required libraries for the languages configured in above step are not present.

In that case, you can deselect the packages you don't need when configuring
For example, say you don't need the support for Ruby. When configuring, you can use:
 
(I had to deselect erlang libraries to get it working on ubuntu 11.04)

After make is completed successfully, install Thrift by,


To check if the installation is successfully completed:
 

You should get an output like:
 

Tutorial are located at ./tutorials directory.

There you will find two files tutorials.thrift and shared.thrift

.thrift files describe the interfaces (IDL) in terms of the classes, methods they include.


This will create a directory named "gen-java" inside your current directory which will include generated Java classes according to specified thrift file.

Now goto the directory "java" inside the current directory (tutorial) and execute ant.
The ant script will compile both generated source files and the source file inside java directory and build a jar file.

Finally, run the tutorial by:
 

You may also find this page useful.

Thursday, September 22, 2011

Running / Debugging Apache Axis2 inside IntelliJ IDEA

  1. Introduction
  2. Required tools
  3. Setting up
  4. Getting the source and Building
  5. Open Axis2 source with IDEA
  6. Run/debug configuration
  7. Add required libraries
  8. Run/debug Axis2 within IDEA

1.Introduction

Apache Axis2 is a famous web services engine and toolkit which is heavily used in industry.


2.Required Tools

Linux
Sun JDK 1.6
IntelliJ IDEA 10.5
Maven 2
Subversion 1.6

3.Setting up

Make sure you've correctly installed Sun JDK, Maven2 and SVN. (refer to my previous posts for details)

4.Getting the source and Building


Create the folder where you want to get sources.
for example, if you want it in "axis2Source"

then get the source from apache subversion repository by,


goto the modules/distribution directory and execute:
 

That will compile the sources and build binary and source distributions.
Goto taget directory. You will see the binary distribution pack created as axis2-1.7.0-SNAPSHOT-bin.zi.
Extract it in the same directory.

5.Open Axis2 source with IDEA

Goto IDEA.
Goto File->Open Project
Browse to the axis2Source directory

Select the parent pom and press OK. IDEA will automatically import all the modules and create the project structure.


6.Run/debug configuration

Goto Run->Edit Configurations
Add "Application" configuration using the "+" button.
Select org.apache.axis2.transport.SimpleAxis2Server as the Mail class


Set the desired log4j properties file as a VM parameter:
For example:


You have to pass axis2 repository location and axis2.xml path as program parameters.
Set the working directory as extracted bin distro root


Select the module you want to debug in "Use classpath and JDK of module" and press OK

 
 7.Add required libraries

Then you have to make sure all the libs required for axis2 to start are available in the classpath.
To configure that, select the desired module (axis2kernal) in project window and press F4 to open configure dialog box.
Goto dependencies tab and press Add, select Library from drop down menu.

Click "New Library..."
Select "Attatch jar directories..."

Select the lib directory of the binary distribution

Give a name such as "axis2Lib" and press OK.
You can also select other modules as dependencies if you want to debug them as well.


Finally, press OK to exit the configuration dialog.

8.Run/debug Axis2 within IDEA

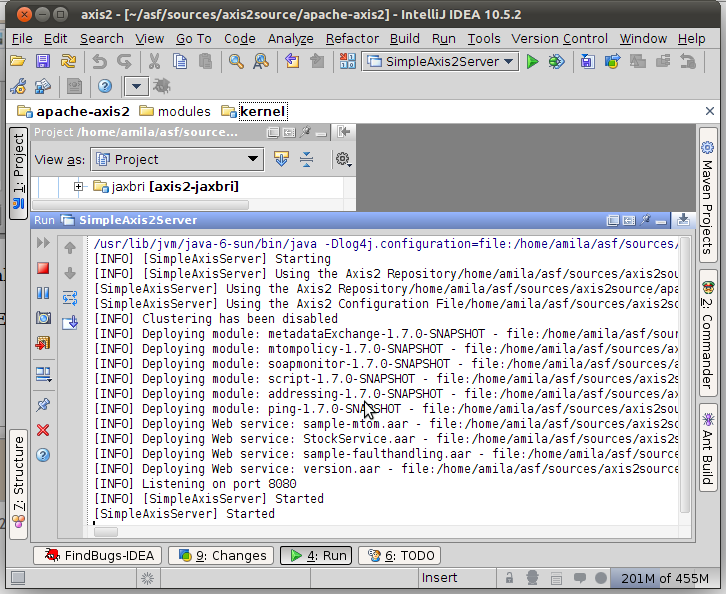
Now you can Start the Axis2 server inside IDEA by the Run command (Shift+F10).
Try pointing your browser to http://localhost:8080/ and see if services get listed.


And you can debug axis2 as you debug any other code. Try setting a breakpoint in SimpleAxis2Server and start debugging (Shift+F9)


Advantage here is that, you don't have to maven build every time you change something, as opposed to remote debugging.

Tuesday, May 31, 2011

XML Pretty Printing Without External Dependencies

This code uses javax.xml.transform to perform a simple XSL transformation to pretty print a given XML as a string. Hope someone will find this useful.

import java.io.ByteArrayInputStream;
import java.io.ByteArrayOutputStream;

import javax.xml.transform.*;
import javax.xml.transform.stream.*;

public class XMLPrettyPrinter {
 
 public static void main(String[] args) {
  new XMLPrettyPrinter().demo();
 }

 private void demo() {
  String input = "info";
  String output = new String();
  try {
   output = this.prettify(input);
  } catch (Exception e) {
  }
  System.out.println("Input XML:\n" + input);
  System.out.println("\nOutput XML:\n" + output);
 }

 private String prettyPrintStylesheet = 
    ""
  + "  "
  + "  "
  + "  "
  + "    "
  + "  "
  + "  "
  + "        "
  + "          "
  + "        " 
  + "  " 
  + "";
 
 public String prettify(String inputXML) throws Exception {

  Source stylesheetSource = new StreamSource(new ByteArrayInputStream(
    prettyPrintStylesheet.getBytes()));

  Source xmlSource = new StreamSource(new ByteArrayInputStream(
    inputXML.getBytes()));
  ByteArrayOutputStream out = new ByteArrayOutputStream();

  TransformerFactory tf = TransformerFactory.newInstance();
  Templates templates = tf.newTemplates(stylesheetSource);
  Transformer transformer = templates.newTransformer();
  transformer.transform(xmlSource, new StreamResult(out));
  return out.toString();
 }

}